 |
CRISTAL WMS
|
|
Picking > Picking
Overview
The RF Picking program is used to pick goods from Sales Orders or Pick Work Orders.
Header Tab
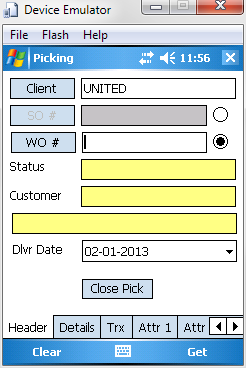
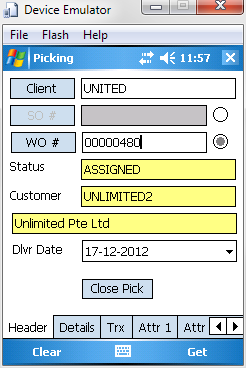
Client
Click the Client button to display and select a client from the client list.
(SO #) and (WO #) Radio Buttons
Select the SO # radio button to pick by Sales Order.
Select the WO # radio button to pick by Work Order.
When the respective radio button has been selected, the associated command button and textbox will be enabled, while the controls for the unselected option will be disabled.
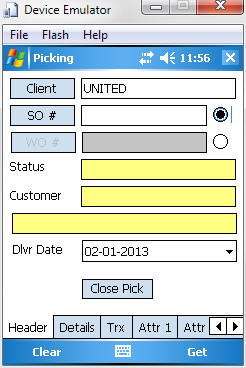
Sales Order Number
If Pick by Sales Order has been chosen, a valid Sales Order Number must be specified.
The sales order must be in "WAITING" status, and should not have any pick tasks generated for it.
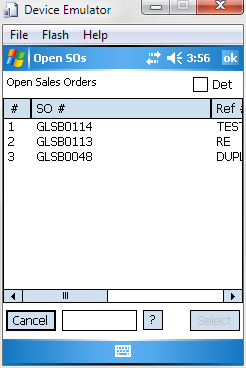
Clicking the SO # command button will display a list of sales orders in "WAITING" status.
Work Order Number
If Pick by Work Order has been chosen, a valid Pick Work Order number must be specified.
The work order must be in "WAITING" status.
Clicking the WO # command button will display a list of open pick lists (i.e. pick work orders).
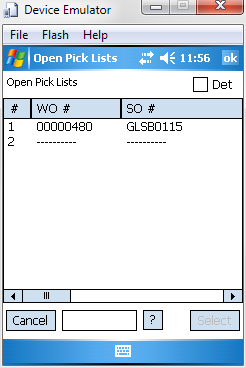
In the display, the work orders listed first (above the separator line) are work orders that have been assigned to the operator. Work orders that are currently assigned to other operators will be listed after the separator line.
Status
This textbox shows the current status of the Sales Order or Work Order.
- For Pick by Sales Order, the sales order must be in
"WAITING" or "PICKING" status.
- For Pick by Work Order, the work order must be in "ASSIGNED" status.
If the sales order/work order is not in this status, the RF Picking program will not allow any pick transaction to be executed.
Customer
The 2 Customer textboxes shows the customer code and name.
Delivery Date
This field shows the required delivery date to the customer.
Details Tab
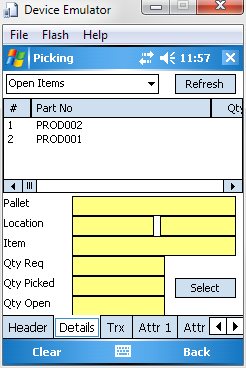
The Details tab shows the detail lines from either the Sales Order or the Work Order.
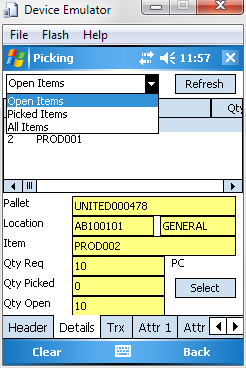
By default, only "Open Items" (ie. items whose qty have not been completely picked) are shown in the grid. You can change the grid to instead display items that are:
- "Open Items" - items with qtys that have not been completely
picked
- "Picked Items" - items that have been completely picked
- "All Items" - this will show all items
[Refresh] Button
If there are many pickers picking the same sales order/work order, you can click the Refresh button to retrieve the current status of the order from the server. Otherwise, the grid will not be updated until after you perform a successful pick transaction on your device.
[Select] Button
When the grid is displaying "Open Items", if you click on a grid line, the line's information will be copied to the following textboxes:
- Pallet
- Location
- Item
- Qty Req (Qty Required)
- Qty Picked
- Qty Open (Qty Open = Qty Required - Qty
Picked)
When these textboxes are populated, clicking the Select button will transfer the selected pick instruction to the appropriate textboxes on the Trx (Qty) tab.
Trx Tab
The Trx tab is a virtual tab that redirects you to the Trx (Qty) tab at the rightmost end of the tab strip.
See Trx (Qty) Tab.
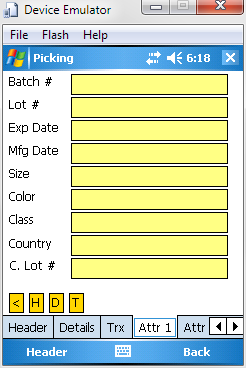
Attr1, Attr2, Attr3, Attr4 Tabs
All these tabs are read only tabs. Users can only view the attribute values shown, but cannot modify any of them.
The Attr1, Attr2, Attr3, Attr4 tabs allow the user to view the attribute information specified in the sales order/work order of the order's line that is currently being picked.

[Acknowledge] Check Box
The Acknowledge check box is sometimes shown on the tab. All the 4 Attr pages have an Acknowledge check box, which is shown or hidden depending on a client configuration parameter.
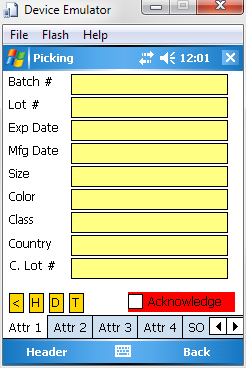
If the check box is shown, the operator must explicitly tick the check box to indicate that the attribute page has been viewed by the operator. Because the attribute pages contain information pertaining to the attribute of the item that is requested in the sales order, the operator can use the information displayed here to visually compare with the actual goods that are being picked.
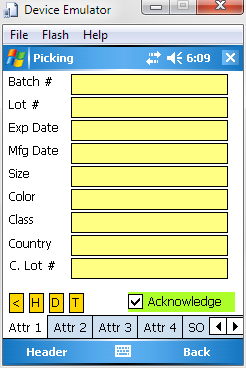
If an Acknowledge check box is shown, the operator will not be able to transact the line item if the check box is left unticked.
Whether Acknowledge checkboxes are shown in the Attr tabs depend on the client configuration.
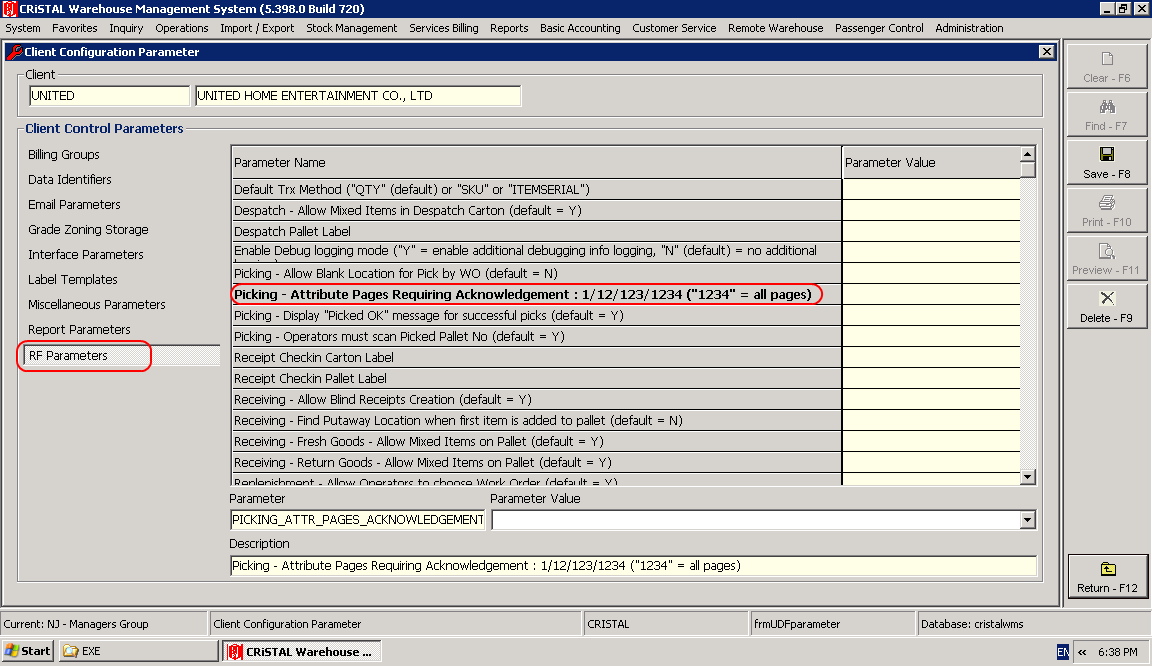
If the PICKING_ATTR_PAGES_ACKNOWLEDGEMENT parameter value is set to "1", that means the Acknowledge check box is only shown on the Attr1 tab.
If the value is set to "13", then the check box is only shown on the Attr1 and Attr3 tabs.
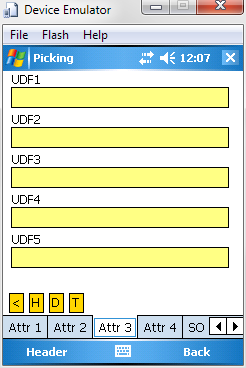
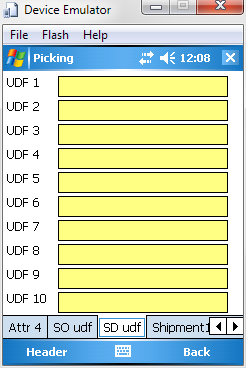
SO udf, SD udf Tabs
The SO udf and SD udf tabs will only display information when picking by Sales Order. This two tabs will not show any information when the program is set to picking by Work Order. Both tabs are read only.
The Sales Order header contains 10 user defined fields that can be used for storing any adhoc information.
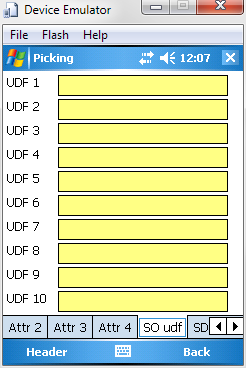
Similarly, every Sales Order detail line contains 10 user defined fields that can be used in a similar manner.
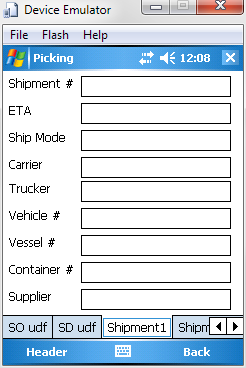
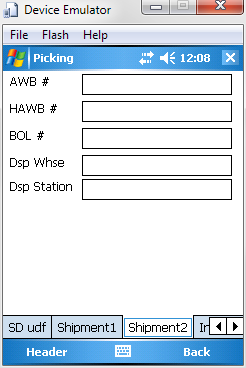
Shipment1, Shipment2 Tabs
The Shipment1 and Shipment2 tabs will only display information when picking by Sales Order. They show shipping information for the goods to the customer as defined in the sales order header.
The fields are display (read only) and cannot be used for updating the sales order.
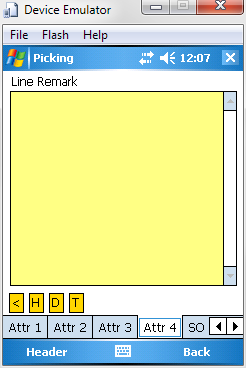
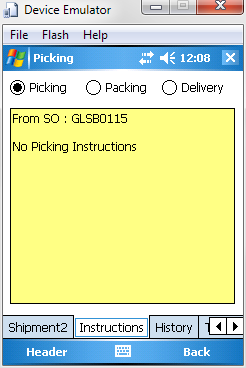
Instructions Tab
The Instructions tab display the special instructions for Picking, Packing, and Delivery as specified in the Sales Order header.
History Tab
The History tab displays the last pick transactions performed on the current device.
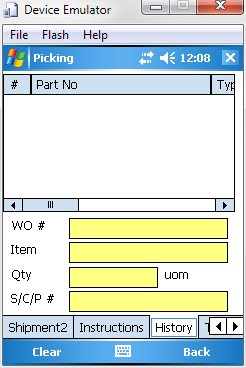
Clear Menu Option
The transaction history must be manually cleared by clicking the Clear menu option. Otherwise, the history will be accumulated until the WMS RF application is exited.
Trx (Qty) Tab
The Trx (Qty) tab is used for picking items by specifying the qty.

Packing Pallet Number Textbox
The topmost textbox is used to enter the pallet number of the Packing Pallet. As items are picked from their storage pallets, the WMS will transfer the qty from the storage pallet ("Pallet From") to the packing pallet.
Due to a design issue, it is not possible to use the Trx (Qty) tab to pick the entire storage pallet by specifying the storage pallet number as the packing pallet number. Instead, it is necessary for the packing pallet number to be a completely different number from the storage pallet number, even if we are picking the entire storage pallet.
The packing pallet is to be sent to the Pick/Pack area, where the picked goods can be re-sorted on to the actual despatch pallets used for delivery. Of course, if no re-packing is done, the packing pallet will also be the despatch pallet itself. Note that it is possible to use the Packing Pallet number as the Despatch Pallet number.
[N] Button
Click the N button to generate a New pallet number for the packing pallet.
[P#] Button
If there is a pallet number specified in the Packing Pallet textbox, clicking the P# button will display the current contents of that packing pallet.
Pick Item Instructions
The yellow textboxes just below the Packing Pallet textbox show the qty and the location of the next item to be picked.
This textboxes are initially filled when you first Select a grid line from the Details tab.
However, once you have picked and completed a line, the program will automatically populate the yellow textboxes with the details of the next line to be picked.
Item Number and Item Description Textbox
The line just below the Packing Pallet Number textbox contains the Item Number and Item Description. Due to screen space constraints, the 2 attributes have been concatenated together and displayed in a single textbox.
(See example of textbox size expansion.)
If an item description is very long, you can click on the textbox itself to expand the textbox size. After viewing the description, click on any other textbox to revert this textbox back to its original size.
Qty Bal Textbox
This field shows the balance qty to be picked for the line item.
When picking by Work Order, the system will always ensure that the entire qty of each work order line can be picked from one location. Thus, there is typically no balance qty left over for the work order line after a pick.
However, when picking by Sales Order, the user may need to pick from several locations to satisfy a sales order line. The Qty Bal field will thus show the outstanding balance qty after each location picked.
Qty Bal Button
The WMS always show the required qty to be picked in units of the the lowest UOM.
However, a qty like "544 PIECES" shown may not be helpful if the packaging is in "CARTONS" of "32 PIECES".
Clicking the Qty Bal button brings up the Whole/Loose Calculator, which will allow the user to convert from the "PIECES" uom to the "CARTONS" uom. Using the calculator, the user can easily calculate that "544 PIECES" translates to "17 CARTONS", and thus pick 17 cartons from the location to satisfy the pick qty requirement.

Item Number Textbox
The white Item Number textbox is required as a confirmation scan of the item being picked.
A GTIN number (Global Trade Item Number) is typically 13-characters long (or 15- or 18-characters long if a 2-char or 5-char supplemental is included as in the food or publishing industries). Being human, operators may mis-read such long character codes during picking if they are only checking the product visually.
Scanning the GTIN barcode on the packaging prevents mistakes during picking as the system will require the scanned item number to be exactly the same as the item number specified in the yellow textbox.
Item Number Button
However, as many operations do not have fully barcoded processes where item numbers can be scanned, the user will be required to use the keyboard to input the long string of characters in the white Item Number textbox.
To accommodate this operations, the Item button can also be clicked to display a list of item numbers which the user can select from, as in the other RF programs. But since the list of items are already defined in the Work Order details or Sales Order details, and these item information are already presented in the grid in the Details tab, clicking the Item button will simply bring you to the Details tab.
When you are in the Details tab, clicking the Select button to will transfer the selected item number in to the white Item Number textbox in the Trx (Qty) tab.
Location From
Users are required to scan the source location in the white Location From textbox.
If picking by Work Order, this must be the same as the location displayed in the yellow Location From textbox.
If picking by Sales Order, there will be no source location displayed in the yellow Location From textbox. The user will thus be required to scan a location that contains inventory of the required item.
Special Feature
Because many operations do not have fully barcoded processes, some warehouses do not have locations barcoded on the storage racks. When that is the case, the user will need to type in the location using the keyboard. But as this can slow the user down, the warehouse may want to eliminate inputting the location in the Location From textbox.
The RF program provides a special setting when using picking by Work Order to bypass inputting the Location From textbox. At the Location From textbox, the user can simply leave the textbox blank and press the <Enter> key. The RF program will then duplicate the value in the yellow Location From textbox into the white Location From textbox, as if the user had actually typed the location into the white textbox.
To configure this behaviour for the client, it is necessary to set the PICK_BY_WO_ALLOW_BLANK_LOCATION parameter to "Y"
Pallet From
Users are required to scan the source storage pallet number in the white Pallet From textbox.
If picking by Work Order, this must be the same as the pallet number displayed in the yellow Pallet From textbox.
If picking by Sales Order, there will be no source pallet number displayed in the yellow Location From textbox. The user will thus be required to scan a pallet number that exists in the source location (as scanned into the white Location From textbox) and that contains inventory of the required item.
Special Feature
Because many operations do not have fully barcoded processes, some warehouses will not have the storage pallet number barcoded on a label that is affixed to the pallet. When that is the case, the user will need to type in the pallet number using the keyboard. But this can be very unwieldy.
The WMS RF program provide a special setting when using picking by Work Order to bypass inputting the pallet number in the Pallet From textbox. At the Pallet From textbox, the user can simply leave the textbox blank and press the <Enter> key.
If picking by Work Order, the program will duplicate the value in the yellow Pallet From textbox into the white Pallet From textbox, as if the user had actually typed the pallet number into the white textbox.
If picking by Sales Order, there will be no value shown in the yellow Pallet From textbox. If you are going to leave the white Pallet From textbox blank, then the white Location From textbox must be specified. The RF picking program will then generate the pick transaction from any pallet in the location that contains inventory for the item.
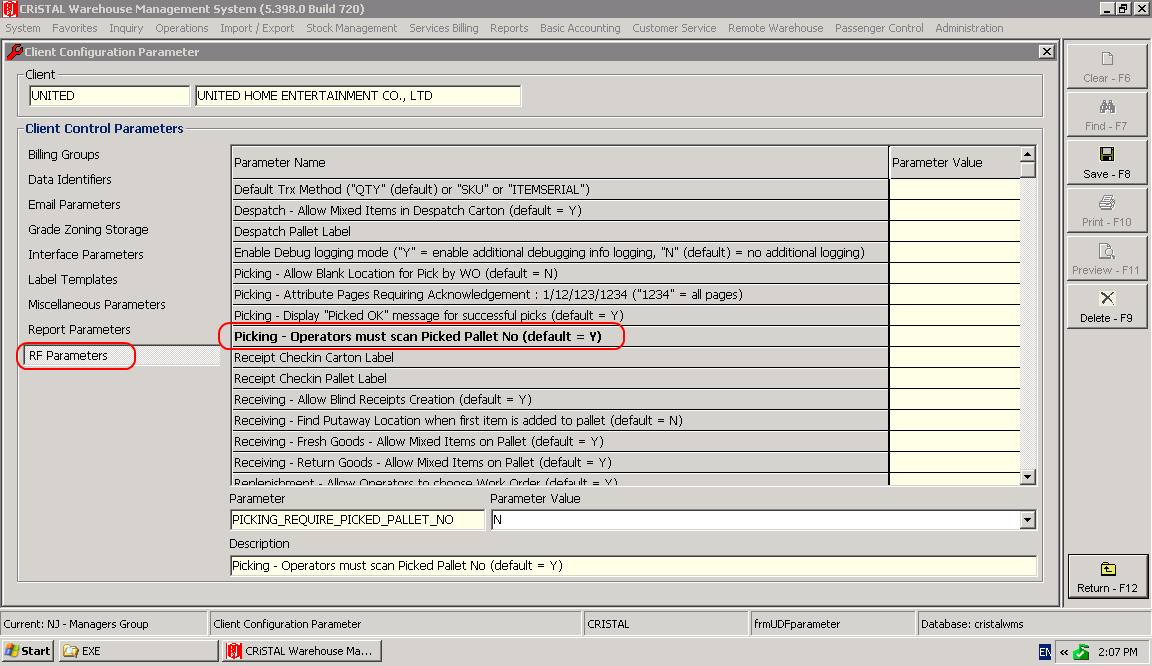
To configure this behaviour for the client, it is necessary to set the PICKING_REQUIRE_PICKED_PALLET_NO parameter to "N".
Qty / UOM
This is used to specify the actual qty / UOM being picked. Although users can specify any valid UOM/qty for the item, the RF program will ALWAYS convert the specified UOM/qty to the Lowest UOM and the Lowest UOM Equivalent Qty.
[Pick] Button
This will perform the pick transaction.
If you enter a number in the Qty textbox and press the <Enter> key, the Pick button action will also be performed.
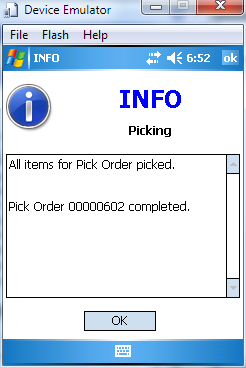
If all the items for a pick order have been picked, the following message window will be displayed:

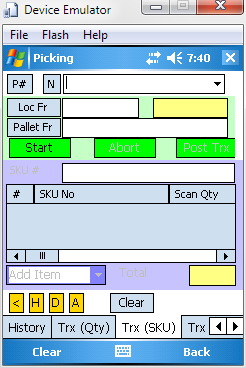
Trx (SKU) Tab
For items that have GTIN/EAN/UPC barcodes (e.g. shoes), it is often easier to simply scan the GTIN/EAN/UPC barcode (which is basically the SKU number) on each piece of item, counting the number of scans for each SKU as the total qty of the SKU that is being picked. This is the function of the Trx (SKU) tab.
Pallet Number
As with the Trx (Qty) method, you must first specify the packing pallet number in the Pallet Number textbox. This should be the same pallet number as the one shown in the Trx (Qty) tab. This must be a unique pallet number across all warehouses, and you can either type in your own pallet number, or click the [N] button to let the system generate a new one.
Location From / Zone From
As with the Trx (Qty) method, users are required to scan the source location in the Location From textbox. Once this is entered, the location's zone will be displayed in the yellow textbox next to it.
See also the description for the Location From textbox for the Trx (Qty) tab (link).
Pallet From
As with the Trx (Qty) method, users are required to scan the source storage pallet number that they are picking from.
See also the description for the Pallet From textbox for the Trx (Qty) tab (link).
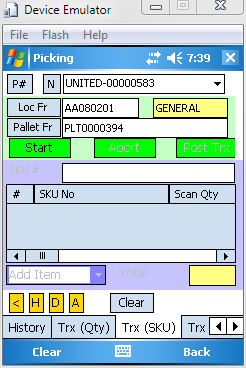
[Start] Button
When picking goods by SKU scanning, you should scan all the SKU barcodes to be added to the packinag pallet in one go.
Click the Start button to initiate SKU scanning. Once initated, the SKU textbox will be enabled. The processing mode will also default to "Add Item".
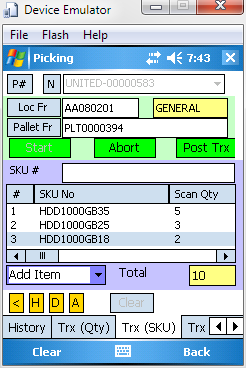
SKU # Textbox
Scan the SKU barcodes in the SKU # textbox. The barcode scanner must send up a Carriage Return control code so as to simulate the pressing of the <Enter> key after each SKU number has been typed into the SKU # textbox. The <Enter> key triggers a validation process that checks whether the input is a valid SKU number for the client, as well as performing a count of the frequency of each SKU number (the Scan Qty).
Note that the general behaviour is similar to that described for the RF Receiving program's Trx (SKU) section. Please follow this link for more details about SKU scanning in general, and how to use the "Add Item" and "Remove Item" functions.
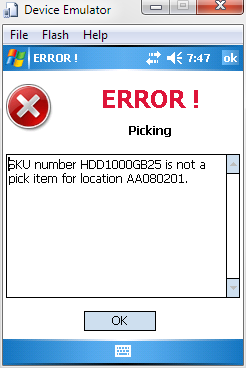
Special Messages
When an invalid SKU number is scanned, an Error message window will be displayed:
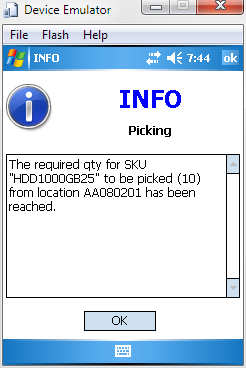
When Picking by Work Order, the RF program will sound and display an Info message window when the required qty of the SKU is reached.
[Post Trx] Button
Once the last SKU number has been scanned, click the Post Trx button. At this point, the RF program will send up all the transacted SKUs and the total scanned qty for each SKU to the server. The server will then deduct the total scanned qty of each SKU as the picked qty, and generate the packing pallet details that will subsequently be used at the Despatch process for creating Delivery Order records.
If there are additional items to pick, the textboxes will be cleared to prepare for the picking of the next item/location for this work order.
Otherwise, if all the items of the work order has been picked, then a message that all items have been picked will be displayed.
Trx (Serial) Tab
The Trx (Serial) tab is used for picking goods that require either Serial Tracking or Serial Recording.
Every piece of item must have a unique Serial Number within the client, so the same serial number identifier cannot be assigned to more than 1 product under a client.
The Trx (Serial) tab is always used together with the Trx (Qty) tab.
On the Trx (Qty) tab, you must first enter the following fields:
- packing pallet number
- item number
- location of the source pallet
- pallet number of the source pallet

[S] Button
Because the Item Number is that for a Serial Tracking item, the Qty textbox will be disabled. Instead, users must click the [S] button, which will transfer the user to the Trx (Serial) tab.
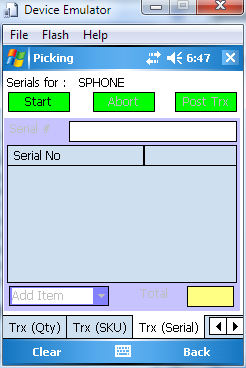
[Start] Button
On the Trx (Serial) tab, click the Start button to initiate Serial scanning. Once initiated, the Serial Number textbox will be enabled. The processing mode will also default to "Add Item".
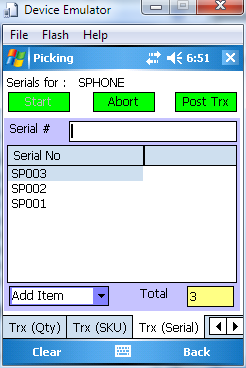
Serial # Textbox
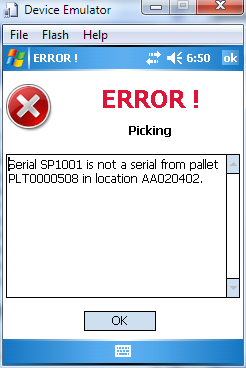
Scan each serial number barcode in the Serial # textbox. The barcode scanner must send up a Carriage Return control code so as to simulate the pressing of the <Enter> key after each serial number has been typed into the Serial # textbox. The <Enter> key triggers a validation process that checks whether the input is a valid serial number (e.g. the serial number has already been picked, the serial number does not belong to the source pallet specified in the Trx (Qty) tab, the serial number is for the wrong item etc).
If an error is detected, an Error Message box will be displayed highlighting the error, and the serial number that was scanned will be rejected.
"Add Item" / "Remove Item"
Sometimes, after scanning a serial number, you may notice that the condition of the item is damaged, and you may want to remove this serial number and scan a different serial number instead.
To do so, you need to switch the processing mode from "Add Item" to "Remove Item".
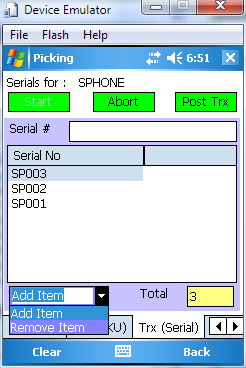
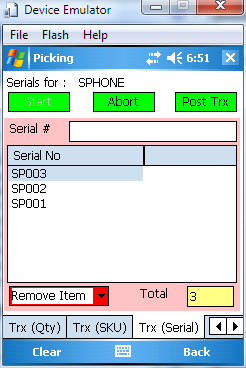
Once the processing mode has been switched to "Remove Item" mode, scan the serial number that you want to remove from the list in the Serial Number textbox. The program will then this serial number from the list. You can then switch the processing mode back to "Add Item" to scan the substitute serial number.
[Post Trx] Button
When the required qty of serial numbers have been scanned, the program will display the following Info Message box:

After dismissing the Info Message window, you can click the Post Trx button to execute the actual pick transaction. The RF program will then send up the scanned serial numbers and create the pick transactions for each serial.
If there are additional items to pick, the textboxes will be cleared to prepare for the picking of the next item/location for this work order. The program will return the user to the Trx (Qty) tab.
Otherwise, if all the items of the work order has been picked, then a message that all items have been picked will be displayed. When the message is dismissed, the user will be returned to the Header tab.